Tutorial - Machine Embroidered Easter Egg Decorations
Explore your Embroidery Stitches and Create Easter Egg Decorations with - or without - your kids!
Many of us have had our sewing machines for many months or even years and only ever used the basic straight, zigzag and perhaps stretch stitch settings! So here is a fun simple project giving you a reason to explore the various embroidery stitches that your machine is capable of and - if you want to share your hobby - you can introduce your child to the fun of sewing at the same time!
This is an ideal first sewing project to do with children, letting them get to know the sewing machine and have a play with some of the different stitches. Once made up, you can use them to decorate your home or garden. Use them as part of your Easter Egg Hunt, or hang them like bunting!
To make these lovely Easter decorations, all you need is felt pieces and - if you chose to make them 3D - some soft scraps of fabric for stuffing your felt eggs.
We've provided two sizes of template, the larger one is ideal for kids who are new to sewing to practice on and the smaller one is a nice size for adults or older kids to work with. I prefer the smaller size for hanging on our Easter Tree.
Watch the video tutorial here!
Suitable for children aged 6+ with close supervision.

You will need:
- An A4 sheet of felt per egg (front and back)
- 15cm of thin ribbon
- A marking tool
- Contrast thread
- Sewing Machine with some decorative stitches
- Sharp fabric scissors
- Download the Template here
- Optional - soft fabric scraps (eg jersey) for stuffing
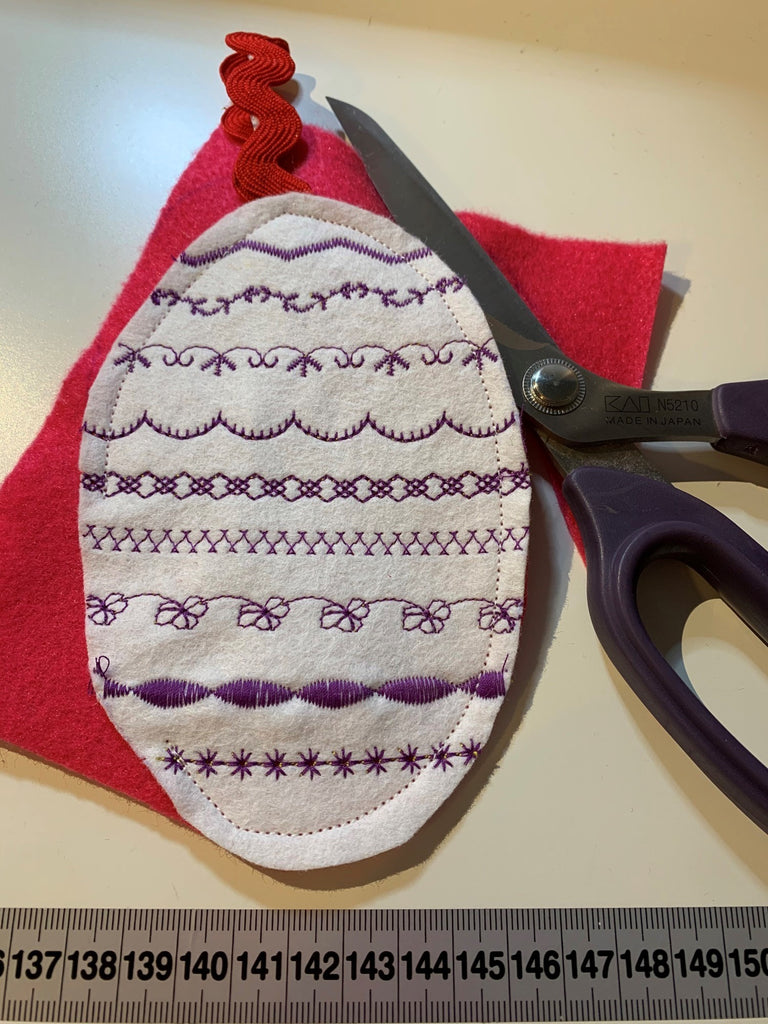
You won’t need too many instructions to see how these lovely felt eggs can come together, but I would advise you to draw the egg onto your felt before you start to explore your stitches, and CUT THE EGG SHAPE OUT AFTER you have decorated it, so you can stitch right up to the edge and the felt does not get caught in the machine.
Step One - Mark out your felt using your template

You can use any erasable marking tool. My favourite is a Frixion pen - I never get bored of the magic as I see the markings disappear when I iron my projects (I use a coolish iron for felt of course!).
Step Two - Draw on Guidelines for Sewing

Using your fabric marker, draw on straight lines across one of the egg shapes, approximately 1.5-2cm apart. If you are using an air erasable marker, it might be worth drawing a couple of lines at a time to make sure they don't fade before you get to sew them. Drawing over the lines multiple times, or pressing hard will also help the lines from fading too quickly.
Step Three - Find some interesting stitches on your sewing machine.

Most modern sewing machines come with some interesting and decorative stitches, even the very basic ones. You might like to play with size settings and see how the pattern shape can be altered by making it longer, taller or shorter than the default setting.
Step Five - Follow the Lines

Starting in the middle, follow each line drawn on the piece of felt with your chosen stitch. Depending on how many different stitches your machine has, you might need to repeat some designs a couple of times. If you are sewing with a child, let them choose each style and let them do their best at feeding the felt through the machine in a straight line. If it does go wobbly, remember - it doesn't matter at all.
Step Five - Sew the decorated felt piece onto a second piece of felt and attach the hanging loop
Make a loop with your ribbon and sandwich it between the two layers of felt at the top of the egg. If you only want single layer eggs, you can stop here!
Or you can join 2 egg shapes together by stitching around the edge, leaving a hole to stuff the egg (if you choose to make it 3D). I would advise you to place the cut egg onto a piece of felt, stitch around it and THEN cut the second egg shape. It is so much easier than trying to keep two small pieces close together as you stitch. If you plan to put some stuffing in, leave a gap in the side of the egg.
If you start sewing at the top of the egg, you can catch the ribbon straight away and you don't have to worry about it as you sew. Sew a couple of back stitches at the beginning and end of your sewing to secure the stitches.
Step 6 - Put some stuffing in (optional)

Then stitch up the opening by hand or on the machine (using a zipper foot so you can get close to the edge).

And you're done! Repeat as many times as you like to make a whole string of them to hang up and decorate your home for Easter, or hang on your Easter Tree. My daughter loves to use them to hang in the garden and play egg hunts!
